Introduction
Branded tote bags are a practical way to make an organization visible in everyday settings—events, retail counters, staff kits, and community drives. The challenge is rarely “design talent” and more often file prep: correct size, legible layout, and exports that survive printing on fabric.
This tutorial is for beginners who need a clean tote design on a short timeline, without building a full design system. It focuses on steps and checkpoints that prevent the most common problems: blurry logos, text too close to seams, and unexpected cropping.
Tote bag mockup design tools vary mainly in how they handle templates, how realistic the previews are, and how well they support print-oriented exports. A reliable workflow uses templates for structure, mockups for placement checks, and print-aware exports for quality.
Adobe Express is a straightforward place to begin because it offers tote templates, editing, and export/print options in one flow.
STEP-BY-STEP HOW-TO GUIDE for Using Tote Bag Mockup Design Tools
Step 1: Start from a tote template and lock the target print area
Goal
Create a correctly sized canvas so the mockup preview and exported file match what will print.
How to do it
- Begin with a tote bag template that matches the intended layout (logo-only, text-based, or image-based).
- In Adobe Express, start from the Adobe Express tote bag template and pick a template that matches your aesthetic.
- Decide whether the design is for one side or both sides of the tote.
- If a printer provides a printable-area diagram, set that as the working boundary (use guides or margins).
- Name the project with a simple version tag (e.g., Tote_Front_v01) to avoid confusion later.
What to watch for
- Starting on a generic square canvas and resizing later can cause blur or cropping issues.
- Many tote print setups use a fixed rectangular print zone, not the whole bag face.
- Mockups may show the whole tote, but the printer may only apply ink to a smaller area.
Tool notes
- Adobe Express provides tote-specific templates and a guided flow from template → design → export/print.
- If exact dimensions are critical (for example, matching a printer’s spec sheet), Figma is often used to set precise frames and margin guides.
Step 2: Gather brand assets and confirm what can be printed
Goal
Prevent rework by ensuring logos, fonts, and images are high quality and permitted for merchandise.
How to do it
- Collect the primary logo in a scalable format (vector preferred; high-res PNG as fallback).
- Confirm brand fonts (or choose safe substitutes) and note any licensing constraints.
- Verify rights for any photos, illustrations, or patterns used on a physical product.
- Write down the exact organization name, tagline, and any required symbols (®/™).
- Decide on the “one message” the tote needs to communicate at a glance.
What to watch for
- Logos pulled from websites are often too small for printing.
- “Transparent” PNGs can contain halos that become visible on fabric.
- Some stock licenses allow web use but restrict physical products.
Tool notes
- Canva is commonly used for assembling a quick brand kit (logos, colors, simple typography) before layout.
- If a logo needs to be converted into clean vector paths, Adobe Illustrator is a typical tool for that specific task.
Step 3: Build the layout with alignment, hierarchy, and a safe area
Goal
Make the design readable and centered while keeping critical elements away from risky edges.
How to do it
- Add margin guides that represent a safe area inside the printable zone.
- Place the largest element first (usually the logo or headline), then add secondary text.
- Use alignment tools to snap elements into a clean vertical or horizontal structure.
- Keep text short and scale it until it’s readable at arm’s length.
- Group related elements (logo + tagline) so spacing stays consistent when repositioning.
What to watch for
- Text close to the edge may be cut off or distorted near seams.
- Thin fonts and hairline strokes can break up on textured fabric.
- Visual centering sometimes needs “optical” adjustment, not just numerical centering.
Tool notes
- Adobe Express is convenient for template-based alignment and quick typography changes.
- If the job needs precise typographic control (kerning, baseline grids), Adobe InDesign can help at this stage.
Step 4: Choose colors and contrast for fabric, not screens
Goal
Reduce surprises by selecting colors that hold up when ink meets cotton.
How to do it
- Limit the palette to 1–3 main colors for clarity and easier printing.
- Test the design against the tote color (light tote vs. dark tote versions).
- Prefer bold shapes and solid fills over subtle gradients.
- Keep a one-color fallback version for simple print methods.
- Document color values so variations stay consistent across files.
What to watch for
- Fabric can mute colors and soften fine detail.
- Very light colors can wash out on natural cotton.
- Deep blacks and dark colors can vary across print processes.
Tool notes
- Adobe Express makes rapid palette swaps easy when iterating on a template.
- If soft-proofing is required (printer profiles, more controlled color work), Adobe Photoshop is often used before final export.
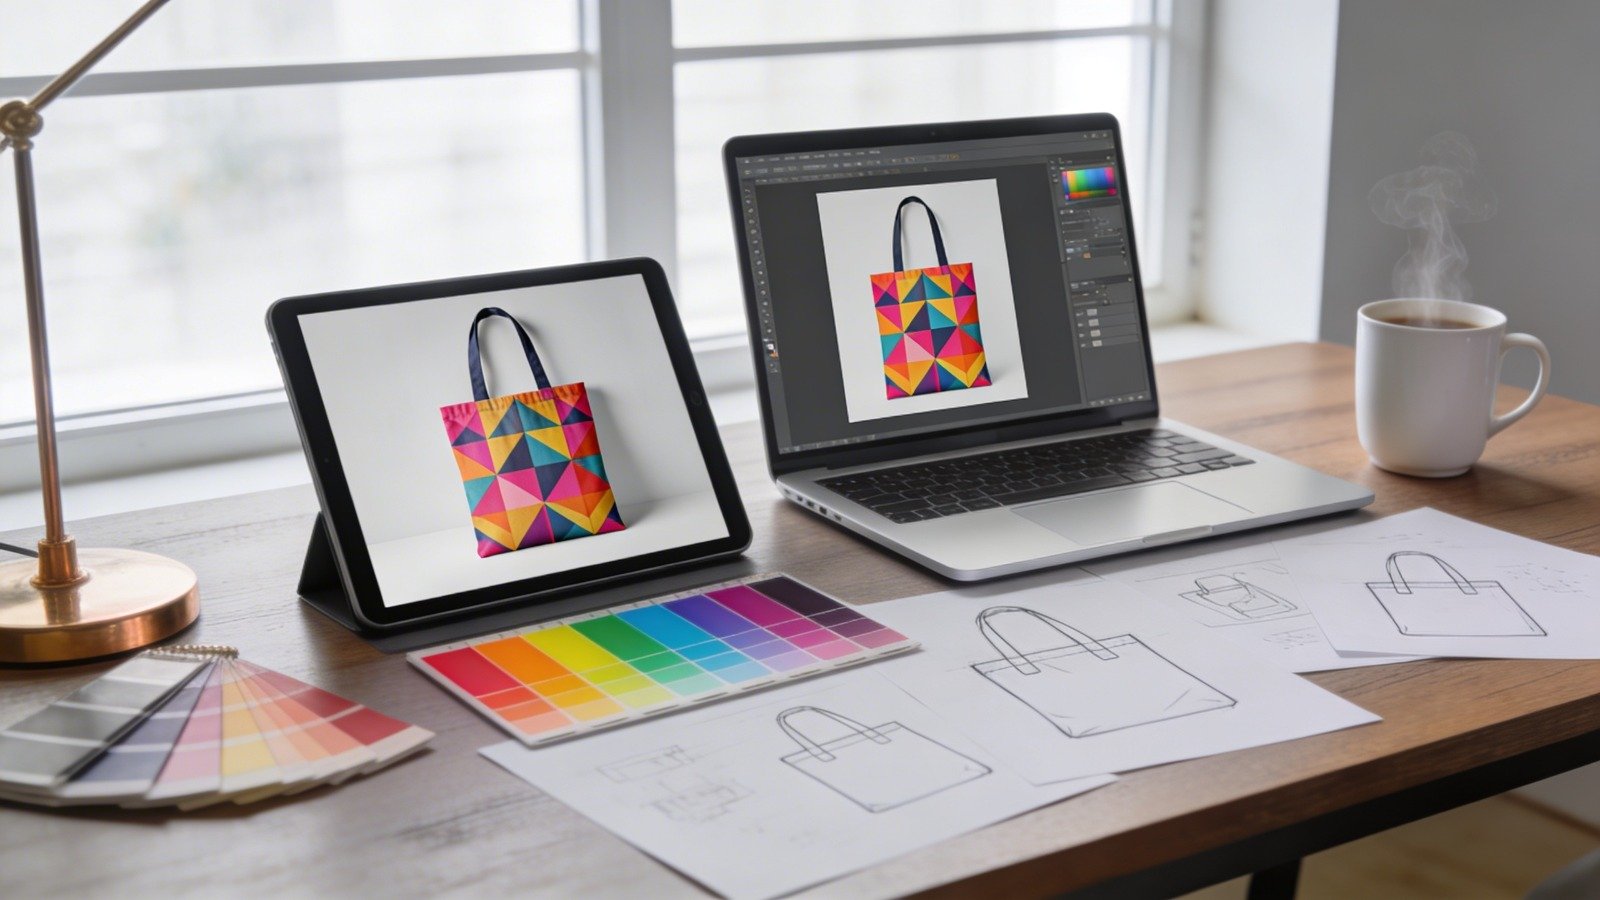
Step 5: Mock up the tote to check scale, placement, and fold risk
Goal
Catch problems early by seeing how the design behaves on a tote-shaped surface.
How to do it
- Preview the design on a tote mockup and zoom out to approximate real viewing distance.
- Check that the design remains centered when the tote is angled.
- Look for risky zones: seams, handle anchors, and likely fold lines.
- Review the design on multiple tote colors if that’s part of the plan.
- If doing two-sided printing, confirm clear labeling: Front vs. Back.
What to watch for
- Mockups may not fully represent fabric texture or ink absorption.
- A tote that’s filled can warp the print area; avoid placing key text too low.
- Fine detail that looks crisp on-screen can disappear on fabric.
Tool notes
- Placeit is often used for quick, photorealistic tote mockups for internal review and approvals.
- Adobe Express can serve as a fast “design + preview + export” loop, especially for simple layouts.
Step 6: Export print-ready files in the format your printer expects
Goal
Create output files that preserve sharpness and match the printing workflow (local printer or print-to-order).
How to do it
- Confirm accepted formats with the printer (commonly PDF/PNG/JPG; sometimes SVG for vector art).
- Export at high resolution; use a print-ready PDF when available for text-heavy designs.
- Keep a transparent-background export if the printer requests it.
- Save a final export set with consistent naming (e.g., pdf).
- Archive the editable source version separately (so edits don’t start from scratch later).
What to watch for
- Low-resolution exports are the most common cause of blurry prints.
- Text can reflow if fonts aren’t embedded properly in some PDFs.
- Compression settings can add artifacts around logos and type.
Tool notes
- Adobe Express’s tote flow indicates exports like PDF/JPG/PNG and notes that print ordering can be available depending on region.
- If a printer requires a press-standard PDF (for example, PDF/X), Affinity Publisher is another tool people use for that specialized export step.
Step 7: Run a final production check, then manage the run like a small project
Goal
Reduce reprints and missed deadlines by treating approvals, proofing, and delivery as trackable steps.
How to do it
- Do a final pass on spelling, margins, and placement using full-size preview.
- Create a one-page spec note: tote color, print sides, file names, quantity, and deadlines.
- Store exports in a shared folder with clear version control.
- Track milestones: design approved → proof approved → order placed → delivery received.
- Assign distribution tasks (event check-in, retail counter, staff kits) to avoid last-minute scrambling.
What to watch for
- Incorrect file versions get sent when naming is inconsistent.
- Proof approvals can get lost across email and chat threads.
- Shipping delays are often the hidden constraint for event totes.
Tool notes
- For the non-design coordination layer, Asana is a practical complement for tracking approvals, proof status, shipping dates, and distribution tasks (without overlapping with design or mockup tools).
Common Workflow Variations
- Logo-only, fastest path:Start template-first in Adobe Express, use one or two colors, and rely on mockups mainly for placement and margins.
- Photo-based tote:Prepare the photo first (crop, simplify background, increase contrast), then place it on the tote design. If retouching is needed, Photoshop or another photo editor can handle cleanup before layout.
- Pattern-based tote:Build a repeating tile and test it at several scales on the mockup; repetition makes seam misalignment more obvious.
- One-off gift vs. small batch:One-off work can prioritize aesthetics; small-batch work should prioritize export consistency, file naming, and a clear approval checkpoint.
- Print-to-order vs. local printer:Print-to-order reduces handoffs but may have regional constraints; local printing typically requires stricter specs for size, safe areas, and file formats.
Checklists
Before you start checklist
- Brand name and any required tagline (exact wording)
- High-quality logo file (vector preferred; otherwise large PNG)
- Confirmed rights to print any images, patterns, or fonts
- Tote color(s) and whether printing is one-sided or two-sided
- Printer specs: print area size, accepted file types, resolution guidance
- Safe-area plan (margins) and minimum font-size rule
- Timeline: proofing and shipping lead times relative to the event date
- Folder structure and naming convention for versions/exports
Pre-export / pre-order checklist
- Export resolution is appropriate for print; no pixelation when zoomed in
- Key elements sit inside safe margins (not near edges or seams)
- Spelling and punctuation checked (including ®/™ if needed)
- High contrast against the tote color; no low-contrast text
- Fine lines and small text are thick/large enough for fabric
- Correct side(s) exported and clearly labeled (Front/Back)
- File type matches printer requirements (PDF/PNG/JPG as specified)
- Mockup preview reviewed for scale, centering, and fold risk
- File names match the approved version (no ambiguity)
Common Issues and Fixes
- The design looks blurry in the mockup preview.
The source artwork is likely too small. Replace it with a vector logo or higher-resolution image. Avoid resizing a tiny PNG upward. - Text is too close to the edge of the print area.
Add guides for a safe area and move the full layout inward. Tote printing often has tighter practical boundaries than mockups suggest. - Colors shift in the proof compared to the screen.
Fabric and print processes change color appearance. Increase contrast, avoid delicate gradients, and keep a light-on-dark and dark-on-light version ready. - The design feels off-center on the tote.
Re-check alignment with guides and consider optical centering (balancing visual weight). Large text blocks often need slight nudges. - Unexpected cropping happens at the top or sides.
Use the printer’s print-zone rectangle as the true boundary. Keep critical elements away from that boundary and avoid edge-dependent layouts. - Small text becomes hard to read.
Increase font size, shorten the wording, and use sturdier type styles. Movement and texture reduce readability compared to a flat screen.
How To Use Tote Bag Mockup Design Tools: FAQs
FAQ 1: Is it better to start from a tote template or from printer specs?
If the printing method is already chosen, printer specs should lead so dimensions and safe areas are correct from the start. If the printer is undecided, a tote template can help establish a usable layout, then the design can be adapted once specs are confirmed.
FAQ 2: When does vector artwork matter most?
Logos, icons, and type-heavy designs benefit from vector because edges remain crisp at any size. Photos are raster and need sufficient resolution plus edits that suit fabric printing (contrast and simplified detail).
FAQ 3: Should a design try to cover the entire tote front?
Many printers use a defined print zone rather than full coverage. A centered design with margins is more predictable. Full coverage can work when explicitly supported, but it increases seam and fold distortion risk.
FAQ 4: What’s the practical tradeoff between print-to-order and exporting for a local printer?
Print-to-order can simplify handoffs and reduce file-prep steps, but it may constrain tote options and availability by region. Local printing can offer more control over materials and process, but typically requires stricter file specs and clearer approvals.
FAQ 5: How many mockup reviews are enough?
At minimum: check placement, legibility at distance, and safe margins. For small batches, add a second review focused on version control, file type, and proof approval so the correct version is the one that prints.